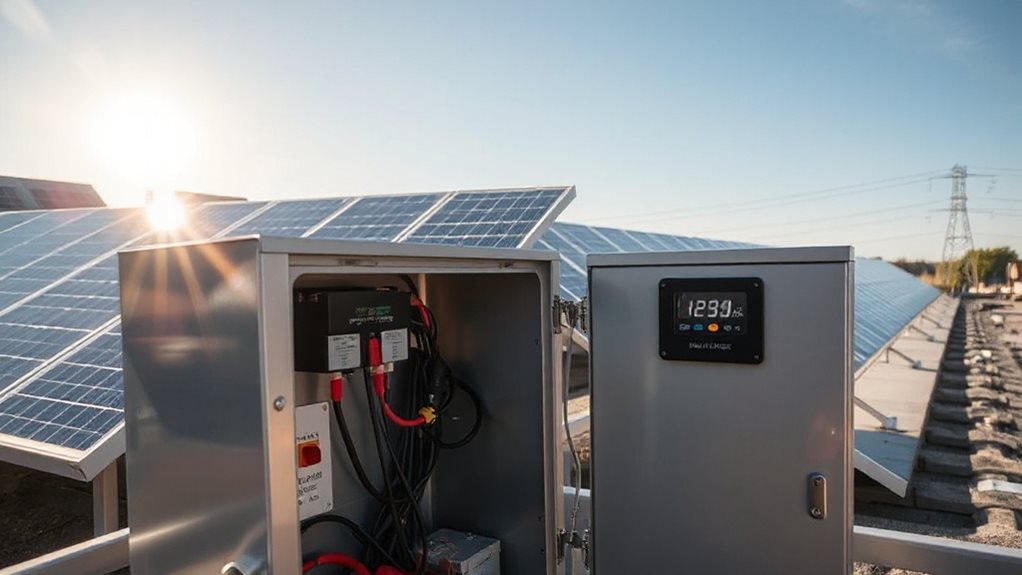
You’re not getting charge because the panels aren’t providing enough voltage or current. Check that they get 4‑6 direct‑sun hours, face true south, and keep them clean and unshaded. Inspect every MC4 connector, tighten loose terminals, and clean corrosion; a bad wire can drop voltage by more than 0.2 V. Measure open‑circuit voltage and short‑circuit current at the controller to confirm they match specs. Verify the controller isn’t tripping on over‑charge or wiring limits, and make certain series/parallel strings stay within its voltage rating. If you follow these steps, the next sections will show you how to troubleshoot deeper.
TLDR
- Loose, corroded, or undersized wiring adds resistance, causing voltage drop that prevents the controller from delivering charge to the battery.
- Insufficient sunlight or shading reduces panel voltage below the controller’s minimum input, so the battery never receives power.
- Open‑circuit voltage (Voc) or short‑circuit current (Isc) far below spec indicates panel damage, shading, or connection faults.
- Controller’s battery‑voltage thresholds (e.g., 2.35–2.45 V per flooded cell) may already be reached, causing it to stop charging.
- Incorrect series/parallel wiring or mismatched panel voltages can exceed controller limits, triggering protection trips and halting charge.
Why Your Solar Panels Aren’t Charging the Battery
Why aren’t your solar panels charging the battery?
Check every connection from panels to controller and controller to battery.
Loose, corroded, or damaged wires add resistance, dropping voltage and blocking flow.
Measure with a multimeter at each point.
Tighten or replace any faulty contacts, make certain breakers sit properly, and verify the controller’s settings.
Clean, undamaged panels and functional components complete the system.
Insufficient sunlight can dramatically reduce the voltage reaching the battery.
In addition, ensure your networked devices or monitoring equipment aren’t introducing unnecessary load or interference that could affect charging efficiency, and verify that the solar charge controller is configured for the correct battery type and charging profile. Overview of DNS settings
Check Sunlight Exposure and Remove Shade
After securing connections, the next step is to verify that your panels receive enough sunlight.
Aim for 4‑6 direct‑sunlight hours, especially between 10 AM and 3 PM.
Trim trees, relocate obstructions, and face panels true south with latitude‑matched tilt.
If shade persists, consider half‑cell modules or microinverters to preserve charging performance.
Regularly monitor signal strength and connection quality through diagnostic menu. Power cycle and reboot processes can help reset charging performance if temporary glitches occur.
Inspect Wiring for Loose or Corroded Connections
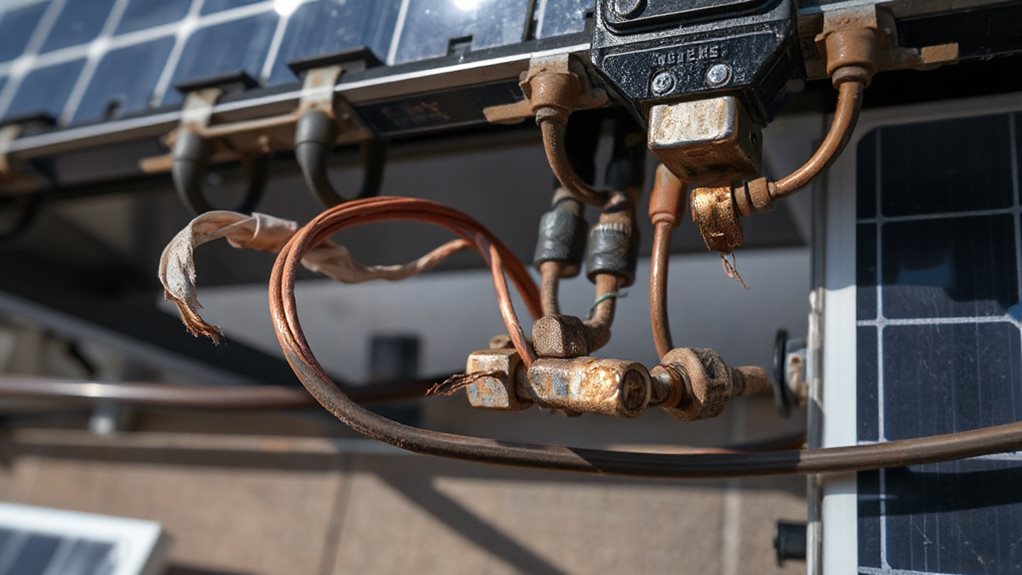
If you notice your solar panel isn’t charging the battery, start by inspecting the wiring for loose or corroded connections.
Look for cracked insulation, green corrosion, or burn marks on terminals.
Tighten MC4 connectors with the right tools, avoiding over‑tightening.
Clean oxidized pins, then test continuity with a multimeter.
Replace frayed cables or damaged connectors promptly to keep power flowing.
To ensure a stable charge, also verify that the solar charge controller is configured correctly and that the battery is within its recommended voltage range verify controller settings.
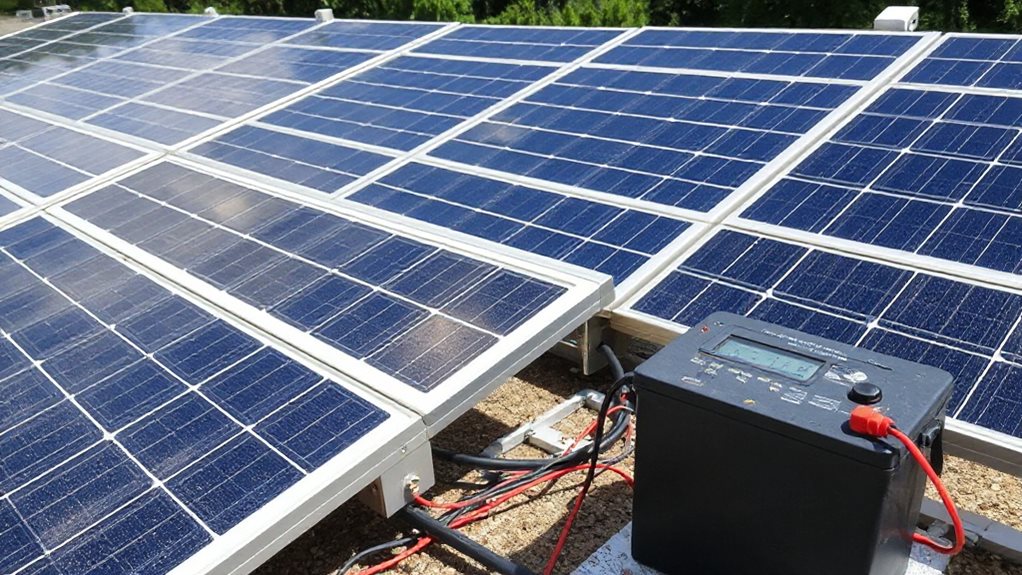
Test Panel Voltage and Current at the Controller
First, disconnect the panel and use a multimeter to record its open‑circuit voltage, making sure the reading is within 10 % of the rated Voc.
Next, set the meter to measure short‑circuit current under full sun and compare that value to the panel’s Isc spec.
Finally, reconnect the panel to the controller, check the voltage at the controller’s solar input, and confirm there’s no significant drop that would indicate wiring or shading problems.
Bandwidth and data transfer concepts help explain why you may see limited charging performance when multiple devices or high-load activities are using the same solar input. Bandwidth
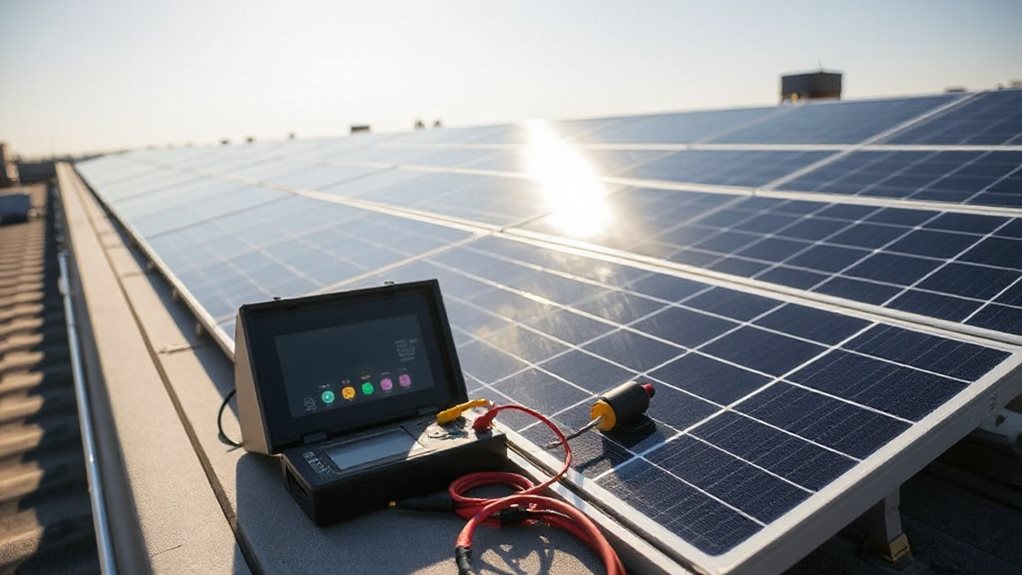
Measure Open‑Circuit Voltage
How do you verify that a solar panel can deliver its rated power before connecting it to a battery?
Disconnect the panel completely, set a digital multimeter to DC volts, and clip the red probe to the plus terminal and the black probe to the minus terminal.
Read the open‑circuit voltage; it should match the datasheet’s Voc, typically 30‑58 V for standard panels.
This confirms the panel’s potential output.
Check Short‑Circuit Current
When you measure a panel’s short‑circuit current (Isc), you’re checking the maximum current it can produce under bright sunlight.
Use a clamp meter or a digital multimeter set to DC amperage, connecting it directly across the panel terminals at noon.
Position the panel perpendicular to the sun for accurate results.
Compare the reading to the spec; significant deviation signals shading, degradation, or wiring issues.
Make certain your controller and fuses can handle the measured Isc.
Verify Controller Voltage Drop
A noticeable voltage drop between the solar panels and the charge controller often points to wiring problems, shading, or mismatched components.
Measure the panel voltage at the controller’s input while under load and compare it to the open‑circuit reading.
Use a digital voltmeter on both positive and negative leads; any drop above 0.20 V per wire or 0.50 V total signals a fault.
Fix corrosion, tighten connections, or replace undersized cables to restore good charging.
Diagnose Faulty Charge Controllers or Inverters
Check the controller’s voltage drop by measuring the DC voltage at the battery terminals and comparing it to the controller’s output; a noticeable difference points to a faulty controller.
Next, verify the inverter’s power output matches the expected rating—if it’s lower than spec, the inverter may be defective.
Finally, look at the fault detection indicators on both devices; consistent error codes or LED warnings tell you which component needs replacement or repair.
Controller Voltage Drop
If you notice that your solar panel isn’t charging the battery, the controller’s voltage drop is often the culprit.
Check wire gauge; undersized conductors raise resistance and sap voltage.
Inspect all terminals for looseness or corrosion and tighten with proper torque.
Measure voltage drop across long runs, especially if distance exceeds 50 ft.
Upgrade to thicker copper or shorten cables to restore efficient power flow.
Inverter Power Output
Why does your inverter’s power output look off? Check AC voltage at the terminals with a multimeter; a missing grid signal often means a tripped breaker or lost utility power.
Inspect safety switches, air switches, and over‑voltage protectors for damage.
Verify the grid is back on and that external AC circuits aren’t interrupted.
If output stays abnormal, test DC input voltage, leakage current, and communication links before assuming a faulty inverter.
Fault Detection Indicators
A quick glance at the controller’s LEDs and voltage readings can reveal most faults before you explore deeper.
Check LED patterns: all blinking means voltage error; red battery flash signals mismatch; fast‑flashing load LED indicates a short.
Measure battery voltage at the bank and controller; they should match within a few millivolts.
Verify PV voltage against panel VMP, allowing ±10 % variance.
If readings diverge, suspect wiring, sensor, or temperature‑triggered protection.
Reset the controller; persistent errors need technician service.
Identify Micro‑Cracks and Physical Damage on Panels
Where do micro‑cracks hide, and how can you spot them before they cripple your system?
Look for uneven output, hot spots, or sudden resistance spikes.
Use EL imaging or thermal cameras for hidden fractures.
Inspect panels after transport, installation, and extreme weather.
Tight clamps, stepping, or heavy loads can cause damage.
Early detection prevents power loss and costly failures.
Verify Correct Series vs. Parallel Wiring for Voltage
Check your wiring layout before you power up the system. Confirm series strings give the controller the voltage it needs—add panel voltages, keep current constant.
If you choose parallel, make sure voltage matches the battery bank and current capacity is wired with thick conductors.
Avoid mismatched strings; they limit power.
Use hybrid series‑parallel for balance, but keep voltage within controller limits.
Understand Over‑Charge Protection Trips
You’ll notice the charge controller’s voltage thresholds kick in once the battery hits its full‑state detection point, preventing further charge flow.
If the system load isn’t prioritized correctly, the controller may trip even while a low‑draw device is still running.
Check the controller settings and load hierarchy to keep over‑charge protection from interrupting normal operation.
Charge Controller Thresholds
When a solar charge controller detects that the battery voltage has reached its preset limit, it immediately reduces or stops the charging current to prevent over‑charging.
You set absorption and float thresholds according to cell chemistry—typically 2.35‑2.45 V per flooded battery cell.
Keep PV series voltage below the controller’s max, match settings across multiple units, and use MPPT for high‑voltage panels.
Proper fusing and temperature sensors add safety.
Battery Full‑State Detection
Detecting a fully charged battery hinges on real‑time voltage monitoring and precise threshold detection.
Integrated circuits watch each cell’s voltage, flagging the 4.25 V cutoff.
When that level is reached, MOSFETs instantly stop current, and blind‑time delays filter out spikes.
Redundant fuses and balancing keep the pack safe, preventing thermal runaway and preserving longevity.
System Load Prioritization
If the system detects a voltage that exceeds the safe limit, it immediately triggers the primary MOSFET protection to disconnect the solar panels, then escalates to the secondary hardware fuse if the over‑voltage persists.
You’ll see fair‑share throttling spread power evenly, while priority‑based logic gives critical loads first claim.
Energy‑by‑departure rules allocate kWh based on need and time, and price‑aware throttling avoids peak‑tariff charging, keeping the battery safe and your freedom intact.
Adjust Panel Angle and Clean Surfaces for Max Output
A properly tilted and clean solar panel captures the most sunlight, turning it into usable electricity. Picture management helps ensure your system’s display and monitoring assets load smoothly, even though it focuses on photos rather than energy data.
Safely Reset the Battery‑Charging System and Know When to Call a Pro
Keeping your panel clean and properly angled gets sunlight to the battery, but a charging issue often stems from the battery‑charging system itself.
Disconnect loads, inspect for damage, and wear gloves.
Measure voltage; if it’s near zero, BMS may be in protection mode.
Use a LiFePO4‑compatible charger with rescue mode to wake it up.
If wires melt, casing bulges, or reset fails after 15 minutes, call a professional.
And Finally
If your panels still won’t charge the battery, double‑check sunlight, clean the glass, and confirm the panels are angled correctly. Inspect all wiring for loose or corroded links, and verify you’ve wired them in the proper series or parallel configuration. Measure panel voltage and current at the controller, and make sure the charge controller and inverter are functioning and not tripped. Reset the system safely; if the problem persists, contact a qualified technician.